


Sissela can sometimes be a complicated character to handle. She has got skills and kit items in a way that you will need to spend some time with her actually to use to the fullest advantage. However, to make things easier for you, we have put together all the useful information regarding her skills, build guides, playing guide, duo and squad gameplay strategies, and her pros & cons. So, let’s see what she has got by getting into her passive, QWER, and weapon skills first without further ado.
Table of Contents
Sissela’s Skills
 | Go Get 'Em Wilson (Q) 50 HP; 6.5 secs cooldown Wilson flies in the targeted direction, dealing damage to enemies in his path and upon arrival. |
 | Girl in a Bubble (W) 60 HP; 19.5 secs cooldown Wilson embraces Sissela, blocking all damage and making her invulnerable. Wilson's shield explodes after the max time, or if the skill is activated again, dealing damage to enemies in an area around her and pushing them back. |
 | Play With Us! (E) 60 SP; 14 secs cooldown Wilson stretches his body in the targeted direction, pulling the first target hit. Ally pull: the target receives a shield for a certain time and the cooldown of Play With Us! is reduced. Enemy pull: Wilson deals damage and stuns the target. |
 | Free at Last (R) 120 SP; 150 secs cooldown Sissela channels for 1 second. After 3 seconds, Sissela deals damage to all enemy players on the map, including herself. She deals additional damage in proportion to her lost HP. Sissela's HP will not drop below 100 when taking damage from this skill. Dealing damage with this skill momentarily increases the damage from Agony. Damage dealt depends on the distance between the enemy and Sissela. |
 | Agony (Passive) No cost; 3 secs cooldown As Sissela's HP decreases, she gains HP regeneration and skill amplification. When Wilson returns to Sissela, her next normal attack deals additional damage and reduces the movement speed of enemies. |
 | Weapon Skill: Caltrops (D) No cost; 35 secs cooldown Throw caltrops in an area, dealing damage to enemies that step on them and reducing their movement speed. Stepping on additional caltrops deals 30% of the initial damage. |
 | Weapon Skill: Smokescreen (D) No cost; 35 secs cooldown A smokescreen appears at the targeted location. Enemies inside the smokescreen have their vision reduced and their movement speed decreased. |
Agony – Passive
The passive skill of Sissela is damage-dealing as well as HP regeneration and skill amplification move. The Agony attack of Sissela enables her normal attack to do some additional damage. Moreover, it also reduces the movement speed of the target by 2 seconds.
Go Get ‘Em Wilson – Q
Sissela unleashes Wilson to cause damage. The Q skill causes damage to the target it hits in two ways; both the first time Wilson is released and the second time Wilson arrives. The cooldown time for this skill is meagre, i.e., 3.5 seconds to 6.5 seconds. However, you will have to sacrifice 50-90 HP level to cast this attack.
Girl in a Bubble – W
The Q skill of Sissela enables her to block enemy attacks. The total time for this skill is 1.5 seconds. The bubble in which Sissela secures herself explodes after 1.5 seconds which deals damage and pushes enemies 2 meters away. The cooldown time for this move is 13-21 seconds and it costs 60-140 HP .
Play With Us! – E
Play with Us causes damage as well as stuns enemies for 1 second. Its effects are different for allies and enemies. Allies get a shield of defense if they are hit by Wilson, whereas enemies receive some damage, and are stunned for 1 second. Cooldown time is between 10-14 seconds. Whereas the SP cost for this move is 60-100.
Free at Last – R
The ultimate skill of Sissela has the most damage causing capability among her skills. However, the cooldown time for this move also the highest, i.e., 120-150 seconds. The unique aspect of this move is that it deals damage to all the players on the map, including the Swedish teen herself. The SP cost for this move is moderate, i.e., 120-180.
Caltrops – D (Shuriken)
Sissela can set a trap of Caltrops in the way of the opponent. This move is both damage-causing and speed reducing. The skill damage for this move is 80/160 + 0.3AP, with -20/40% speed reduction. The cooldown time for this move is 35 seconds.
Smokescreen – D (Throw)
Sissela can decrease the vision of her opponents with a smokescreen weapon skill. The cooldown time for this weapon skill is 15-20 seconds, and the effective range of this move is 7 meters. Besides visibility reduction, this skill also reduces the movement speed of the targeted opponents.
Skill Leveling Order
Q> E> W> R> Passive
The reason why we keep the ultimate skill of Sissela at almost the last position is its difficulty level. It is hard to actually execute the Free at Last move of Sissela with full advantage. Therefore, we would recommend you to put your points in Q, W, and E skills. They have lesser cooldown time and can easily be used for maximum benefit.
This skill order is the same for all the builds; however, of course you are free to find your own preference!
Sissela’s Builds
Shuriken Build with Azure Dagger
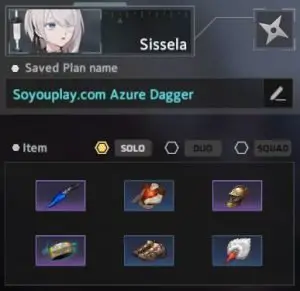
Shuriken build for Sissela with Azure Dagger; Saved Plan ID 332574
The Azure Dagger Sissela build is pretty handy for early gameplay dominance. It has a two zoner weapon build-up, which means that you’d be able to ultimately make Azure Dagger by the end of the second zone. Using Azure Dagger for this build will provide you with extra attack power (+20), some Extra-Normal Attack Damage (+33), and a useful skill amp (+27). It is a robust early gameplay build, so you need to be careful in the latter part of your game with Sissela. Killing many players early on is a good way to gain the much-needed levels you’ll need to dominate the end-game.
Items required for this build:
You need to have the following items for this build:
- Weapon: Azure Dagger
- Chest: Sunset Armor
- Head: Imperial Burgonet
- Arm: Draupnir
- Legs: Straitjacket Sneakers
- Accessories: White Crane Fan
Build Route
Alley> Temple> School> Forest> Avenue
You will need to search through standard five zones to ultimately build your weapon and items. Starting off from Alley is a good option with Sissela. You will not have to worry much about other competitors. However, you need to be careful when stepping into the Temple zone. You should find the items required to build Azure Dagger there. Once you get the weapon, try to take the maximum benefit of that by killing as many players as possible. In this way, you set yourself up for a strong position in the final stages of the game.
Fuhma Shuriken Build
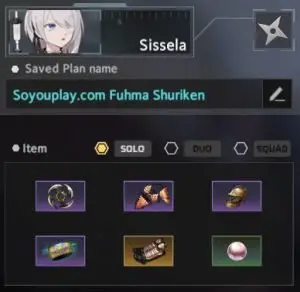
Sissela build with Fuhma Shuriken; Saved Plan ID 332576
This build is quite useful and tanky. Fuhma Shuriken will provide you with more attack power than the first build, i.e., +40. Besides, it also aids in reducing the cooldown time by +15%. Extra Normal attack damage is also slightly more significant than the first build, i.e., +36. Overall, it is a reliable build for Sissela and can win you games.
Items required for this build:
You need to have the following items for this build:
- Weapon: Fuhma Shuriken
- Chest: Amazoness Armor
- Head: Imperial Burgonet
- Arm: Draupnir
- Legs: EOD Boots
- Accessories: Buddha Sarira
Build Route
Alley> Cemetery> Hospital> Temple> Archery Range
This build also has a five zoner route. However, you would have to search through three zones to build your weapon ultimately, instead of just two. It is a bit slower build route but can help you in the latter part of the game. So, be careful and conscious in the first three zones. Once you complete the weapon, you can then capitalize on killing your opponents with Fuhma Shuriken.
Auto-Attack Throw Build
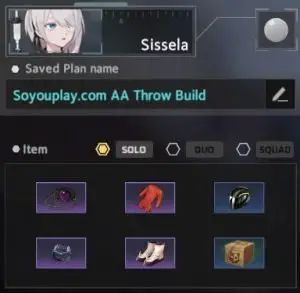
ENAD build for Sissela; Saved Plan ID 332579
And lastly, you can try out the Throw weapon with Sissela as well. In this build, you will be using David’s Sling as your primary weapon. The weapon has tons of attack power and is very handy in HP regen. We call this build as Extra-Normal Attack Damage (ENAD) build because of the weapon and item types. Following ENAD items would be used for this build:
Items required for this build:
You need to have the following items for this build:
- Weapon: David’s Sling
- Chest: Dragon Dobok
- Head: Motorcycle Helmet
- Arm: Cube Watch
- Legs: White Rhinos
- Accessories: Schrödinger’s Box
Build Route
Avenue> Alley> Chapel> Archery Range> Dock
A standard five-zoner build is what you will see for this build too. You’re be able to build your weapon after the Chapel zone. You can shuffle a bit with the route by going through Alley, Avenue, and Archery range first and then going for the last two zones. However, if you do so, you would only be able to use David’s Dobok in the latter part of the game. Being quick and precise in different zone searches is the best option to perform well with this build.
How to Play Sissela
Sissela is a character who loves using aggressive tactics to dominate her opponents. Going ultra-attacking with her is an ideal option. However, you need to keep the following skill guidelines in mind to fully harness her skills.
Passive Skill Guide
The passive skill of Sissela is a good starting move. You can start off attacks with the Agony move and then launch other skills. Moreover, this skill is also useful to increase the HP regen and skill amp.
Q Skill Guide
The Q skill of the Swedish girl is quite useful in many circumstances. The best way to harness this is to make sure the enemy gets hit twice; both upon release and arrival of Wilson. The cooldown time for this move is relatively shorter, so you can often afford to use it. However, you need to keep an eye on your HP level before you cast it again and again.
W Skill Guide
Girl in a bubble move is quite handy, especially in duo or squad gameplays. Whenever you feel surrounded by opponents, use this move to defend yourself and push enemies 2m away from you. Moreover, you can also use the W button to defend Sissela against a heavy charging animal. This move is very handy with lesser cooldown time and moderate HP cost.
E Skill Guide
This move is beneficial for the duo and squad gameplay. You can add a shield of defence for your allies with the help of Wilson. If a partner gets hit by Wilson, he or she gains a protective shield. The surrounding shield lasts for 3 seconds. Enemies being hit by this move will damage and be stunned for 1 second.
Moreover, you can use this skill in a pair with other moves. Stun your opponent with this move first and then launch other skills of Sissela over stunned enemies to cause more damage.
R skill Guide
Free at last is Sissela’s spectacular ultimate move. She causes damage to all the players with this skill, including herself (though she will not bring herself any lower than 100 HP). The cooldown time for this move is higher, so you need to be precise in its execution.
Free at Last deals more damage the lower Sissela’s HP is and the closer the enemy is. It is a great ‘last resort’ move when you are close to dying, and has a decent chance of killing your opponent before he or she kills you.
Weapon Skill Guide (Shuriken)
Make sure to throw caltrops in the right direction to cause maximum damage to your enemies. This move is quite handy in causing damage as well as reducing the movement speeds of enemies. Hide Sissela behind an object and throw caltrops for her opponents. You can also use this move in combination with other skills of Sissela. For example, caltrops move is convenient if used with Q, E, or the ultimate skill of Sissela.
Weapon Skill Guide (Throw)
Smokescreen is quite useful to run away from the charging enemies. Whenever you feel dominated by opponent characters or animals, use this weapon skill to avoid further damage. Moreover, you can also use this skill in combination with other effective moves of Sissela. For example, mixing the smokescreen with the ultimate skill or Q move of Sissela is a viable option.
Teams and Match-ups for Sissela
Finding a perfect teammate for Sissela is a difficult task. The ideal way would be to look for the players with the same nature as hers. To help you in this regard, let’s discuss some of the ideal options for Sissela to win Duo and Squad gameplays.
Duo gameplay
Sissela is an aggressive, early gameplay character, so it would be ideal for playing her with Zahir for Duo gameplays. Zahir is also a quick, furious, and attacking player. The same weapon (Throw) would also mean that these two would start off their Lumia island journey closer to each other, which surely is an added advantage.
Other than Zahir, Sissela can also play well with Adriana. She is also a fast character and can perform really well with Sissela. However, while making a Duo team with either of these two players will mean that you would need to be careful of Tier compositions players. Players such as Aya, Hart, Magnus, and Chiara, are prime examples.
Squad gameplay
Squad gameplays require a team with varying abilities. Sissela would do wonders if grouped together with Aya, Magnus, and Zahir. Long-ranged bullet fires of Aya with the furious and quick skills of Zahir would be enough to take down any opponent team. The defensive, as well as heavy attacks of Magnus, would be an added advantage for you.
Sissela’s Strengths and Weaknesses
Strengths
- Sissela has 2 weapon options to choose from: She can choose either a Throwing weapon or a Shuriken as her primary weapon.
- Her skills are long-ranged: Sissela’s passive, QWER, and weapon skills are long-ranged, and you can target your opponents by standing a bit farther.
- Sissela has good support options: Sissela can provide allies with shields, which is useful for saving your teammate or to enable them to dive in head first.
Weaknesses
- She is a complicated player for beginners: If you are new to Eternal Return: Black Survival, you may find it challenging to use this character’s kits and skills effectively.
- Her passive and QWER skills are a bit harder to use: You would need to spend some time playing as Sissela to actually master her skills.
- The damage to her QWER skill is lesser than the difficulty level: You may feel Sissela as a less rewarding character. The amount of effort you would put in is not directly proportional to the skill damage you get. There are easier characters that deal more damage with less effort.