


Isol is an absolute powerhouse with his crit items, and is one of the top characters of Eternal Return: Black Survival. Like all our previous articles, we will be focussing on Isol’s skills, builds, playing guide, duo and squad gameplay, and his strengths and weaknesses. So, without further ado, let us dive into Isol’s passive, QWER, and weapon skills.
Table of Contents
Isol’s Skills
 | Semtex Bomb (Q) 60 SP; 18 secs cooldown Isol throws a bomb to the target location that sticks to an enemy or on the ground. The bomb explodes after a certain time, rooting enemies caught in the blast. If the bomb is stuck to an enemy, each attack reduces its timer and increases the damage and time rooted of the explosion. |
 | Rebel Assault (W) 70 SP; 16 secs cooldown Isol unleashes a fury of bullets in front of him. Enemies hit have their movement speed reduced, starting from their last damage taken from Rebel Assault. |
 | Camouflage (E) 110 SP; 22 secs cooldown Isol rolls forward and blends into his surroundings, going invisible. The invisiblity is lifted after a certain time or of Isol does any action other than movement. |
 | MOK Operational Mine 80 SP; 30 secs cooldown Isol installs a MOK Operational Mine on the ground. The mine explodes when an enemy enters its range, dealing damage and reducing the movement speed of enemies hit. |
 | Guerilla Warfare (Passive) No cost Isol arms traps faster and remembers the location of traps that he saw being placed. Enemies that take damage from his traps have their defense reduced for a certain time. |
 | Weapon Skill: Moving Reload (D) No cost; 50 secs cooldown Increase movement speed and quickly reload your gun. The cooldowns of all your other skills are reduced, except for your passive and weapon skills. |
 | Weapon Skill: Overheat (D) No cost; 30 secs cooldown When hitting an enemy with a normal attack, you gain an Overheat stack for each bullet. If you do not use a normal attack for a certain time, you start to lose stacks. When you reach the maximum number of stacks, you can activate the Overheat skill. When this skill is activated, the attack speed cap is ignored and your normal attacks gain a knockback effect. |
Guerilla Warfare – Passive
Isol’s passive is Guerilla Warfare. Isol’s traps reduce the defense of his enemies and remembers any trap he saw being placed. This skill is not a damage-dealing attack. It only reduces the defensive abilities of enemies in Isol’s target. The defense weakening duration for Guerilla Warfare is 3 seconds, and it is used instantly without any SP cost.
Semtex Bomb – Q
Isol throws a Semtex bomb in a targeted direction with his Q skill. He can either throw a bomb to the ground or attach it to the body of an enemy. You can aim the Semtex bomb as far as 8 meters. The casting time for this bomb attack is 0.27 seconds, and skill damage is fatal. Cooldown time is also moderate, ranging from 10 to 18 seconds.
Rebel Assault – W
Rebel Assault is really a monster attack of the Brazilian teenager. He unleashes the bullet assault in a targeted direction. Isol can fire as far as 8 meters using his W skill. This attack causes damage as well as reduces the movement speeds of your opponents. Cooldown time and SP cost for this skill are affordable, i.e., 12 to 16 seconds and 70 to 130 SP level.
Camouflage – E
Camouflage is more a fleeing skill rather than a damage-causing attack. It makes you invisible for a certain period. The invisibility time ranges from 2.5 to 3.5 seconds and is really handy in squad gameplays. However, you need to keep in mind that the invisibility will vanish if you cast any attack or take any action such as looting or crafting.
MOK Operational Mine – R
MOK Operational Mine is similar to the Semtex bomb skill; however, the ultimate attack of Isol is more like a trap instead of an instantly damaging ability. Enemies who don’t notice this trap fall prey to the explosive material set by the Brazilian teenager. The cooldown time for this skill falls between 20 to 30 seconds and costs around 80 SP. This skill also causes movement speed reduction by 10 to 30%.
Moving Reload – D (Pistol)
This weapon skill will allow you to run away from enemies and reload your pistol weapon. It will also reduce the cooldown of other QWER skills.
Overheat – D (Assault Rifle)
You gain overheat stacks while hitting enemies with the auto-attacks of Isol. Activating Overheat increases the attack speed of Isol and pushes enemies away from him.
Skill Leveling Order
Q> W> R> E> Passive
Putting in a lot of points in enhancing Isol’s Q skill is a viable option. Detonating clinging material is truly a handy option to have in Solo, Duo, and Squad gameplays. You should assign lesser value to the passive skill of Isol, as it is just a defense reducing skill rather than being a damage-causing attack. You can keep the same skill order for all the builds below.
Isol’s Builds
Crit Assault Rifle Build
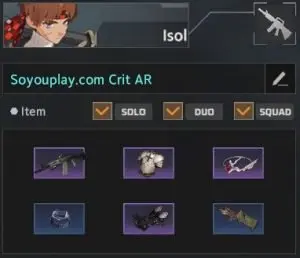
Critical strike build for Isol; Saved Plan ID 284876
We start off our build guide for Isol with an assault rifle build. The best advantage that you would have with AK-12 is its incredible attack power (+94). This assault rifle also has a decent amount of vision range and a formidable critical strike chance (+25%). You should target to build this weapon as soon as possible to run past your enemies. However, you will need to go through 3 zones and hunt different materials to fully acquire this weapon.
As soon as you have your weapon, you are ready to try to get some kills. Rush through the zones and start killing ASAP.
Items required for this build:
- Weapon: AK-12
- Chest: Crusader Armor
- Head: Crystal Tiara
- Arm: Cube Watch
- Legs: Bucephalus
- Accessories: Laced Quiver
Route:
Hospital> Cemetery> Chapel> Temple> Avenue
It is a five-zoner build route; however, you would have your hands at AK-12, Bucephalus, and Crusader Armor by the end of the third zone. These three items combined gives you a lot of chasing power, early damage, and attack power. All these attributes will surely help you dominate your targets.
You are free to change the order of the first three zones by shuffling them with one another. The idea is to build your weapon first and then start hunting the rest of Isol’s gear.
Gatling Gun Build (AR)
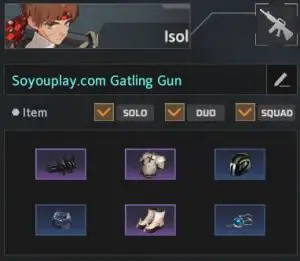
Gatling Gun build for Isol; Saved Plan ID 284880
Secondly, you can also use the Gatling Gun with Isol. The early game and mid-play damages for this build are very high. That sets this build apart from other ones. In this build, you would use a Gatling Gun in a four-zoner build path.
This variant of assault rifle gives you lethal Attack Power, Attack Speed, and Extra Normal Attack Damage. With this weapon, you will absolutely shred your opponents.
Items required for this build:
- Weapon: Gatling Gun
- Chest: Crusader Armor
- Head: Motorcycle Helmet
- Arm: Cube Watch
- Legs: White Rhinos
- Accessories: Moonlight Pendant
Route:
Cemetery> Factory> Chapel> Uptown
It is a short four-zoner build path. You will build your items within four zones that are very close to each other. Overall this route is less competitive compared to other ones. The second and the last zones, i.e., Factory and Uptown, are easy to play around with. However, you need to be careful in the Cemetery and Chapel to find all your required items.
Electron Blaster Build (Pistol)
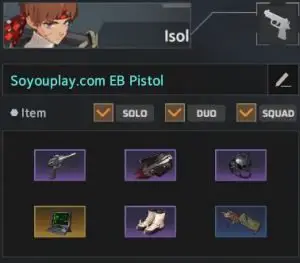
Electron Blaster build for Isol; Saved Plan ID 284884
If you love playing with a pistol, try out this build having Electron Blaster as your main weapon. Overall, pistol builds are more popular among Isol players than builds with assault rifles. You generally build your weapons quickly, i.e., within the first two zones. It is a useful build for Solo, Duo, and Squad gameplays. It is a glass cannon kind of auto-attack build type and is very convenient.
Items required for this build:
- Weapon: Electron Blaster
- Chest: Butler’s Suit
- Head: Tactical OPS Helmet
- Arm: Radar
- Legs: White Rhinos
- Accessories: Laced Quiver
Route:
Uptown> Factory> Chapel> Hospital> Pond
You would roam around five zones to acquire all your gadgets. Through this path, you would end up completing your boots and weapon in the Factory. Overall, a quick build route that will enable you to hunt for your opponent players very early into the game.
Skill Amp Build (Pistol)
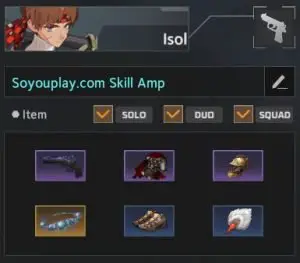
Skill Amplification Build; Saved Plan ID 284886
And lastly, we have a skill amplification Isol pistol build using Devil’s Marksman as your prime weapon. The skill amplification capability (+40%) sets this weapon apart from other pistols. Other than skill amp, this build also provides you additional attack power, attack speed, and movement speed. Overall, it is a winning pistol build to try with Isol.
Items required for this build:
- Weapon: Devil’s Marksman
- Chest: Commander’s Armor
- Head: Imperial Burgonet
- Arm: Bracelet of Skadi
- Legs: Straitjacket Sneakers
- Accessories: White Crane Fan
Route:
Factory> Chapel> Cemetery> Pond> Avenue
You would need to through five zones to gather all your items. Factory and Chapel are the first two zones, and by the end of these two, you should have the Devil’s Marksman in your hands. Be careful to enter the last three zones, as you may find these places full of opponents. If you do encounter someone, your best bet is to fight rather than flee.
How to Play Isol
Isol is an explosive character. He is a very quick, fierce, and aggressive player. If you prefer ultra-attacking gameplay, you will be sure to dominate other characters in the Lumia Island. Isol is very strong in early gameplay, so never leave any stone unturned to take advantage of this attribute. Getting some early kills in is a great way to gain a level advantage.
Passive Skill Guide
Using this skill in combination with any other skill is a viable option. Try to reduce the enemy’s defense first and then launch heavy attacks. You can also use this skill to prevent Isol from falling into an invisible trap. Defense reduction due to this skill would range from 5 to 25%.
Q Skill Guide
The best way to use his Q attack is to stick the bomb tothe enemy’s body. If you throw the Semtex bomb on the ground, the enemy may get away from it until it explodes. So, to ensure the successful detonation, you must direct the explosive bomb at your opponent’s body.
Moreover, the cooldown time and SP cost for the Semtex Bomb is also moderate. Therefore, you should plan to use this skill quite often.
W Skill Guide
Isol can unleash tons of bullets in a targeted direction for 2 seconds. This skill is so deadly that it can knock enemies down with a single cast. However, you need to be fast and witty to get the maximum value out of Rebel Assault.
You can use this skill in two ways, i.e., either unleashing bullets while standing firm on your feet or while running away from an enemy who might overpower you. Heavy/tanky characters such as Magnus or Xiukai can be the best targets for the Isol’s assaulting skill. Cooldown time and SP cost for these attacks are also moderate, so you have the freedom to cast this skill whenever you need.
E Skill Guide
You can utilize Camouflage to escape from the enemy’s aggression. This skill will make you invisible for a certain period. You should cast the E button in situations where you do not have any other option but to run away from the enemy’s range. Camouflage becomes really handy in squads where you get to face team attacks. Harness the E button and go untraceable for a few seconds with the Brazilian fury.
R Skill Guide
The ultimate skill of Isol is truly a battle-winning skill. You can set a trap for your opponents and cause damage. The best thing about MOK Operational Mine is its capability to explode by detecting enemies around a 1-meter range.
Moving Reload (Pistol)
Reloading your pistol while running away or towards your enemies is what this skill does. Try out this skill when you run out of ammo. The Pistol weapon skill also reduces the cooldown time for your QWER skills.
Overheat (Assault Rifle)
You can activate the Overheat when a certain number of stacks are reached by auto-attacking. If you do not use auto-attacks, you will lose your stacks after a certain period. This weapon skill is handy, especially for causing more damage and increasing weapon speed.
Attack combos
Combining attacks to cause more damage is a useful option. Following are our suggestions to mix a variety of skills together while playing Isol.
- Use the passive skill of Isol with his Q or W attack
We would highly recommend you to utilize the defense reducing skill of Isol with his damage-causing attacks. This combo can be achieved by using Q or W with the passive. Reduction in shielding strengths of enemies is a tool to cause more damage.
- Use Rebel Assault with MOK Operational Mine
Both of these attacks are immensely powerful. However, the damage increases multifold if you use the W button with the R button. Set a prey for your opponents first by throwing some explosives. And then, use fiery bullets to cause the maximum damage possible.
Teams and Match-ups for Isol
Choosing the right partner for both Duo and Squad gameplays is highly critical. You need to opt for the characters that perform at their best when teamed up with the Brazilian player. Here are a few possible choices that you can make for Duo and Squad teams with Isol.
Duo gameplay
Xiukai or Magnus is pretty much strong characters to match with Isol for Duo gameplays. You can add any of the above two on your side two make a winning Duo team. Most of the Steam players go for Magnus with Isol and get desired results. However, Xiukai is also a useful player to be on your team.
When you play with either of the above two, chances are that you would dominate players with lesser defensive strategies, such as Adriana, Sissela, or Li Dailin. However, Aya, Hyejin, Hart, and Zahir can give you a tough time when any of them form a Duo team.
Squad gameplay
Aya, Chiara, and Rozzi can be bonus players for you in squad gameplays. Aya and Rozzi have similarities in terms of their weapons with Isol. This would mean you can start off your build journey together, and it is a huge advantage to stay as close to your teammates as possible.
You can easily beat most ‘standard’ melee/short range squads, like Hyunwoo, Fiora, and Emma. The long-ranged attacks of Isol and his squad members will give you an added advantage against these players.
However, be careful when you meet characters like Magnus, Hart, and Jackie. These kind of squads can match your aggression and give you a tough time.
Isol’s Strengths and Weaknesses
Strengths
- The cooldown time for most of Isol’s skills is moderate: You’ll wait 8 to 30 seconds to use these skills again, meaning you never really run out of abilities to use.
- SP cost for his QWER attacks is also bearable: The SP cost for the Brazilian boy’s QWER attacks is moderate, ranging from 60 to 120.
- He has two weapons to choose from: Isol can either use a pistol or an assault rifle in different builds.
Weaknesses
- You may run out of Ammo:Isol uses a pistol and assault rifle as his weapons, so you may run out of bullets in between a fight. Be wary of that and always keep your weapon fully loaded outside of combat.
- The assault rifle builds of Isol need a variety of items: Pistols are relatively easy to play around with. However, you need to go through different zones to complete your assault rifles, losing out on some of Isol’s early game strength.